How to Increase the PHP Memory Limit in WordPress

PHP Memory Limit – If you’ve updated your PHP, removed poor-quality plugins, cleaned up your content, and you’re still getting memory errors, you may need to increase the memory limit.
There are several ways to accomplish this goal:
- Edit your wp-config.php file.
- Edit your PHP.ini file.
- Edit your .htaccess file.
- Use a memory increase plugin.
- Contact your hosting provider.
Table of Contents
How to Increase the PHP Memory Limit in WordPress
1. Edit your wp-config.php file.
If you’re reasonably confident in your tech skills, you could try editing your wp-config.php file.
First up? Getting to it. Use a file transfer protocol (FTP) or SSH file transfer protocol (SFTP) service to connect with and access your WordPress files. Your mileage will vary depending on the solution you use, but you should see something like this:
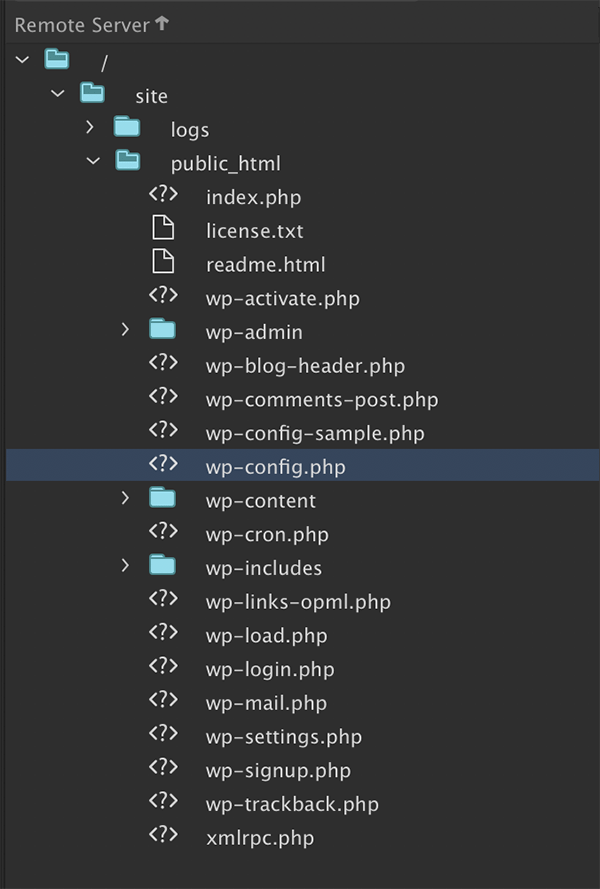
Open the wp-config.php file and search for this text string: define(‘WP_MEMORY_LIMIT’, ’32M’);
Then, modify it to read define(‘WP_MEMORY_LIMIT’, ‘128M’); You can go as high as 256MB, but in most cases, you won’t need this much memory.
2. Edit your PHP.ini file.
If editing your config file doesn’t solve the problem, you can also try modifying your PHP.ini file. Worth noting? Since this file governs server settings, you won’t be able to modify it if you’re using a shared hosting provider.
Look for the line memory_limit = 32M and again change it to read 128M. It’s also a good idea to modify the max_execution_time line. This line specifies the amount of time in seconds allotted for a PHP script to run. If the time limit is exceeded, PHP returns an error. Increasing this number gives your scripts more time to run, which is a good idea if you’re planning to use more memory-intensive services and plugins.
3. Edit your .htaccess file.
Your last file editing resort is the .htaccess file. While it is accessible via the directory and file list returned by FTP connections, the “.” in front means that it’s a hidden file. If you don’t see it, check to make sure your FTP or SFTP solution is set to display all hidden files and directories.
Once you’ve accessed the file, find this line: php_value memory_limit Then, add the value you want — 64M, 128M, or 256M — and save the file.
Regardless of the file editing method you choose, make sure to clear your cache before checking to see if the problem is resolved.
4. Use a memory increase plugin.
Another option to increase your available PHP memory is through the use of a plugin, such as the WordPress WP Memory Limit, Memory Usage, Server Memory, and Health plugin. This plugin works with WordPress version 5.2 or higher and lets you modify available PHP memory without the need to access or modify files.
5. Contact Your Hosting Provider
Last but not least? Contact your hosting provider and ask them to increase your WordPress PHP memory limit. Depending on the type of hosting you have — shared, dedicated, or virtual private server — this may be a quick fix or it may not be a service offered.
PHP memory errors in WordPress are frustrating, but they aren’t permanent. By modifying your WordPress files, using a plugin, or contacting your hosting provider, it’s possible to significantly increase your available memory and avoid PHP problems.
Related posts:
![How to Make Your WordPress Site Load Faster in 2023]()
How to Make Your WordPress Site Load Faster in 2023
![How to Add Custom JS to WordPress: A Beginner's Guide]()
How to Add Custom JS to WordPress: A Beginner's Guide
![What is the difference between WordPress.com and WordPress.org?]()
What is the difference between WordPress.com and WordPress.org?
![The Top WordPress Plugins Every Website Needs in 2023]()
The Top WordPress Plugins Every Website Needs in 2023
![How to Fix the 502 Bad Gateway Error in WordPress?]()
How to Fix the 502 Bad Gateway Error in WordPress?
![Vulnerabilities in Nine WordPress Plugins Affecting Over 1.3 Million Websites]()
Vulnerabilities in Nine WordPress Plugins Affecting Over 1.3 Million Websites
![How to Fix the WordPress Critical Error in Website]()
How to Fix the WordPress Critical Error in Website
![How To Migrate A WordPress Website From One Host To Another]()
How To Migrate A WordPress Website From One Host To Another
![How to Solve the Connection Timed Out Error in WordPress]()
How to Solve the Connection Timed Out Error in WordPress
![WordPress vs. Squarespace: Which is Better for Your Website?]()
WordPress vs. Squarespace: Which is Better for Your Website?
![How to Start a Blog on WordPress]()
How to Start a Blog on WordPress
![10 Reasons Why Joomla Is The Best Content Management System You're Not Using]()
10 Reasons Why Joomla Is The Best Content Management System You're Not Using
![How to Secure Your WordPress Website from Hackers]()
How to Secure Your WordPress Website from Hackers
![Best Free WordPress Themes]()
What Are The Best Free WordPress Themes?
![How to Become Proficient in WordPress: A Comprehensive Guide]()
How to Become Proficient in WordPress: A Comprehensive Guide
![Common WordPress Mistakes and How to Avoid Them]()
Common WordPress Mistakes and How to Avoid Them
![What is the fastest CMS for SEO?]()
What is the fastest CMS for SEO?
![How To Reduce Your TTFB and Boost WordPress Page Speed]()
How To Reduce Your TTFB and Boost WordPress Page Speed
![Best CMS for SEO: The Ultimate Guide]()
Best CMS for SEO: The Ultimate Guide
![How to fix the Error Establishing a Database Connection in WordPress?]()
How to fix the Error Establishing a Database Connection in WordPress?
![How to fix the White Screen of Death (WSoD) in WordPress]()
How to fix the White Screen of Death (WSoD) in WordPress
![WordPress Errors and Their Solutions: Troubleshooting Your Website]()
WordPress Errors and Their Solutions: Troubleshooting Your Website
![Does CMS matter for SEO?]()
Does CMS matter for SEO?
![10 Reasons Why WordPress is the Ultimate Website Platform]()
10 Reasons Why WordPress is the Ultimate Website Platform
![15 Most Important Things You Need to Do After Installing WordPress]()
15 Most Important Things You Need to Do After Installing WordPress
![The Pros and Cons of Using WordPress for Your Business Website]()
The Pros and Cons of Using WordPress for Your Business Website
![How to Fix the Parse Error, Syntax Error, Unexpected in WordPress]()
How to Fix the Parse Error, Syntax Error, Unexpected in WordPress
![How to solve the 500 internal server error in WordPress?]()
How to solve the 500 internal server error in WordPress?
![How to Fix the 500 Internal Server Error on Your WordPress Website]()
How to Fix the 500 Internal Server Error on Your WordPress Website
![10 Effective Ways to Speed Up Your WordPress Site]()
10 Effective Ways to Speed Up Your WordPress Site
![7 Signs Your WordPress Site Has Been Hacked]()
7 Signs Your WordPress Site Has Been Hacked
![The Ultimate Guide to Troubleshooting WordPress Errors: Tips and Tricks!]()
The Ultimate Guide to Troubleshooting WordPress Errors: Tips and Tricks!
![WordPress Tips | 15 Tips and Tricks for Beginners]()
WordPress Tips | 15 Tips and Tricks for Beginners
![Why WordPress Is the Perfect Choice for E-Commerce Websites]()
Why WordPress Is the Perfect Choice for E-Commerce Websites
![Awesome Shortcodes For Your WordPress Blog: A Comprehensive Guide]()
Awesome Shortcodes For Your WordPress Blog: A Comprehensive Guide
![What is the Best SEO-Friendly CMS?]()
What is the Best SEO-Friendly CMS?
![How to Fix Unable to Upload Images in WordPress?]()
How to Fix Unable to Upload Images in WordPress?
![How to Create a WordPress Website in 5 Easy Steps]()
How to Create a WordPress Website in 5 Easy Steps
![7 Common WordPress Mistakes You Need to Avoid]()
7 Common WordPress Mistakes You Need to Avoid
![How to fix WordPress posts returning 404 error]()
How to fix WordPress posts returning 404 error
![How to Fix the Internal Server Error 500 in WordPress]()
How to Fix the Internal Server Error 500 in WordPress
![Why WordPress Is the Best CMS for SEO]()
Why WordPress Is the Best CMS for SEO
![How to fix image upload issue in WordPress]()
How to fix image upload issue in WordPress